Tenonless Shoe Rack
I created this project first and foremost to test some new production methods. I also just happen to need a shoe rack.
Oops-All-Tenon
I have a proclivity for the mortise and tenon joint. It's strong and relies on mechanical contact for loads in shear and compression. The glue is only put under load in tension, and most designs won't call for substantial loading of such a joint under tension.
The big drawback, of course, is that the mortise and tenon takes quite a bit of effort. Even with specialized tools (like a pantorouter) creating the tenons is relatively costly in terms of time. Accuracy can be pretty critical as well; small errors in tenon-depth create ugly gaps in the final assembly. The mortises are tricky to make as well; however they can be done by CNC with perfect accuracy.
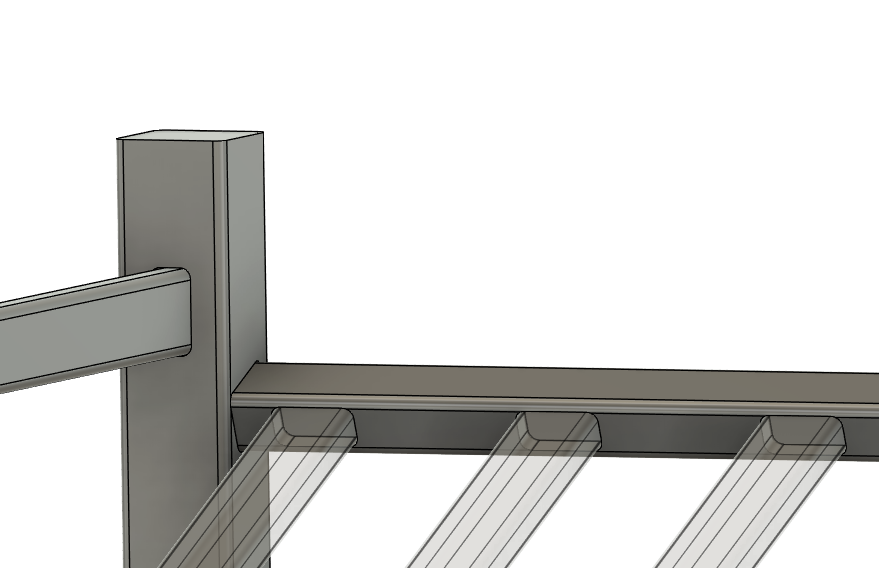
I've come up with a sort of design pattern in response to these issues: remove the tenon entirely (or make the entire beam a tenon). It's extremely easy to run rectangular beams down a table router and round off all four long edges. The result is one very long tenon. Mortises are cut by CNC and the whole project may be assembled easily with no signs of poor accuracy.
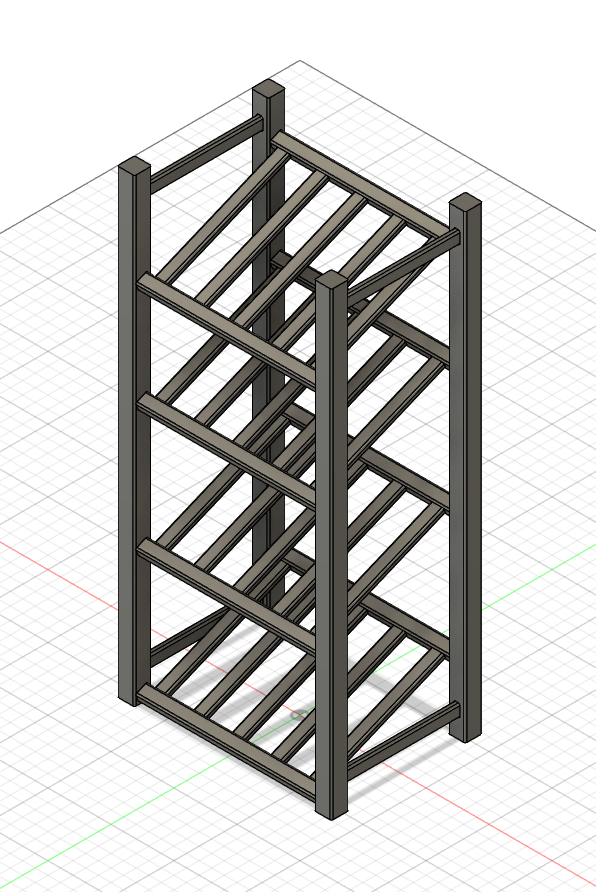
Every beam in this design (except for the four vertical posts) is a tenon. Every part has the same 1/8" radius fillet all the way down every long edge.
The theoretical advantages are numerous:
- Damage to the edges of beams (the second most vulnerable part of the geometry) is filleted away at the end, removing it.
- Damage to the ends of beams (the most vulnerable part) is hidden inside of the mortises.
- Tight tolerances are only required on features for which it is easy to hold high tolerance (planed thickness and CNC-cut mortises).
- Glue-up step requires few if any clamps (still testing this one).
There are some drawbacks:
- Finishing must be done post-assembly, as it's hard to avoid coating the glue-mating surfaces of the 'tenon'.
- A 'flush' surface can not be created with this method (the mortise 'sets back' the tenon edges).
Project Planning
I really need to get better at predicting project time costs. So I'm going to estimate the cost of each step right now and then record my actual times.
| Category | Item | Predicted (min) | Actual (min) | Notes |
| Create Fixture | CNC Setup | 10 | 20 | |
| Drill Holes | 10 | 12 | 10min predicted by Fusion | |
| Rebolt | 5 | _ | ||
| Bore Jig | 21 | _ | 21min predicted by Fusion | |
| Install Clamps | 10 | _ | ||
| Mill Lumber | Cuts | 15 | 25 | |
| Joint and Plane | 45 | 24 | ||
| CNC | Columns | 40 | _ | 15min per rack predicted by Fusion, plus changeover time. |
| Tiltposts | 32 | _ | 1 min per predicted. 1 min changeover. 8x per rack. 2 racks. | |
| Table Routing | All | 88 | _ | 0.5min per four edges, 176 edges per rack, 2 racks. |
| Sanding | All | ?? | _ | No idea. |
| Finishing | 1st Coat | ?? | 1hr | Faster than I'd have guessed. |
| 2nd Coat | X | X | Did not need to perform. |
Fabrication Steps
Final mill results (per stack):
| Count | Cross-Section | Length |
| 20x | 1 x 0.5 | 11" |
| 4x | 1 x 0.5 | 10.25" |
| 8x | 1 x 0.75 | 15.25" |
| 4x | 1.375 x 1.375 | 36.5" |
Steps:
- Check that there's a 1/8" radius router bit available.
- Cut a 2x6 (8ft) into lengths: 11.25", 11.25", 11.25", 15.5", 15.5" (11.25, 22.625, 34, 49.625, 65.25)
- Cut a 2x4 (8ft) into lengths: 37", 37" (37, 74.125)
- Run all pieces through the joiner.
- Carefully mill down the 2x6 bits into 1" thick exactly pieces (+0.005 max).
- Mill down the 2x4 bits to 1.375" thickness (+.05 max). Less critical.
- Cut 24x 0.5" strips of the 11.25" material. Accuracy is important (+0.015 max). Check the tolerances that are possible on the nice tablesaw, and record them for future engineering.
- Cut 8x 0.75" strips of the 15.25" material. Accuracy is important (+0.015 max).
- Cut 4x 1.375" strips of the 37" material. Less critical (+.05max).
- Cut 20 0.5" strips to 11" long.
- Cut 4 of the 0.5" strips to 10.25" long.
- Cut 0.75" strips to 15.25" long.
- Cut 1.375" strips to 36.5" long.
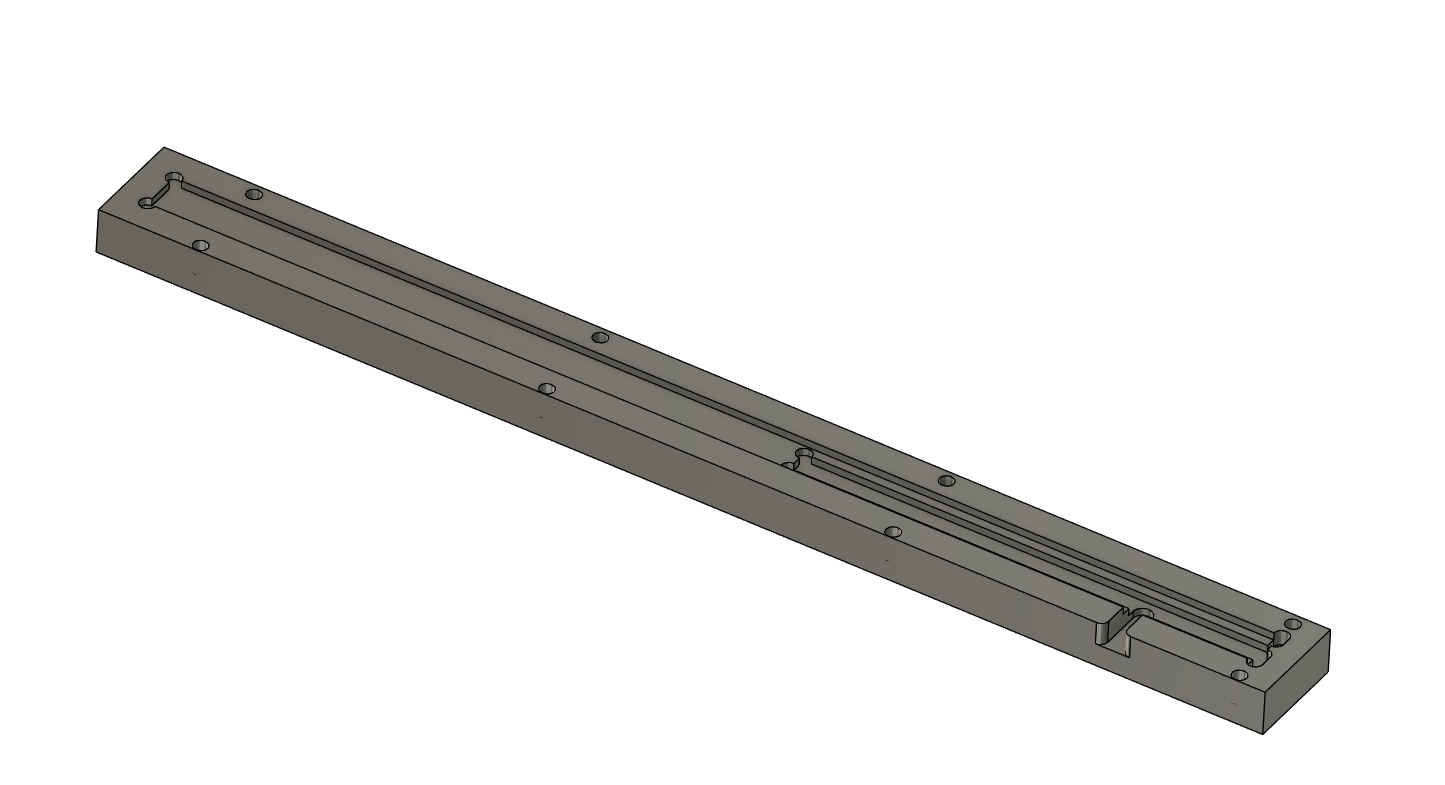
- Cut a 2x4 to 38.5" long. This will be the fixture.
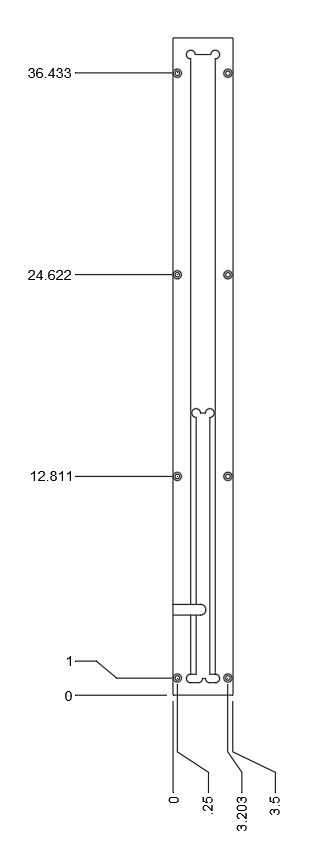
- Drill holes as pictured such that the 2x4 can be bolted onto the CNC machine. Ideal counterbore depth is .875", and the thru-hole is 1/4" (or 1/32" under if possible). These dimensions should be checked against the machine before drilling.
- Bolt the fixture into the machine. Zero and run the fixture creation CNC code.
- While it runs, cut some clamps out of scrap to hold the pieces in place.
- Clamp in the large pieces and run the code for each side. Note that there are three different programs and some of the parts are mirrors. Reference the model. After the first piece test the fit.
- Then run all the medium sized pieces. All are identical. After the first piece test the fit.
- Run all pieces down the router to give 1/8" radius to all long edges.
- Check fits.
- Drill dowel holes in relevant locations on large beams.
- Sand?
Short List:
- Long wood screws
- Drill and bits
Lessons Learned
There are some little quirks of the process that cause big delays down the line, mostly to do with surface finish.
Table Saws are Terrible
Table saws do not hold tolerance well. However, my shop has a pretty nice table saw.I measured the width of 40 identical cuts and found +/- 0.01" to be the resulting tolerance (3σ). However, even this nice table saw leaves really bad patterns on the wood surface itself that require extensive sanding to remove.
The solution is to cut maybe 0.06" to 0.1" wider than needed and perform a final planing pass on up to both sides of the resulting beams. This ensures high accuracy and better surface finish. The big win is less time spent sanding later.
However, there will be situations where the resulting piece is taller than it is wide and can not be planed post-cut. Then it's necessary to sand it well or pass through the TimeSaver. Softwoods can not go through the TimeSaver, however, so I must keep that in mind when designing future projects!
Fixtures are Great!
I performed my first ever fixture-based CNC run with this project and I'm very pleased with the results. The fixture is effectively a throwaway part which holds the many identical beams in place while the mortises are cut into them. This saves a tremendous amount of time when changing work out of the CNC machine that would otherwise be spent clamping and aligning the billet for cutting.
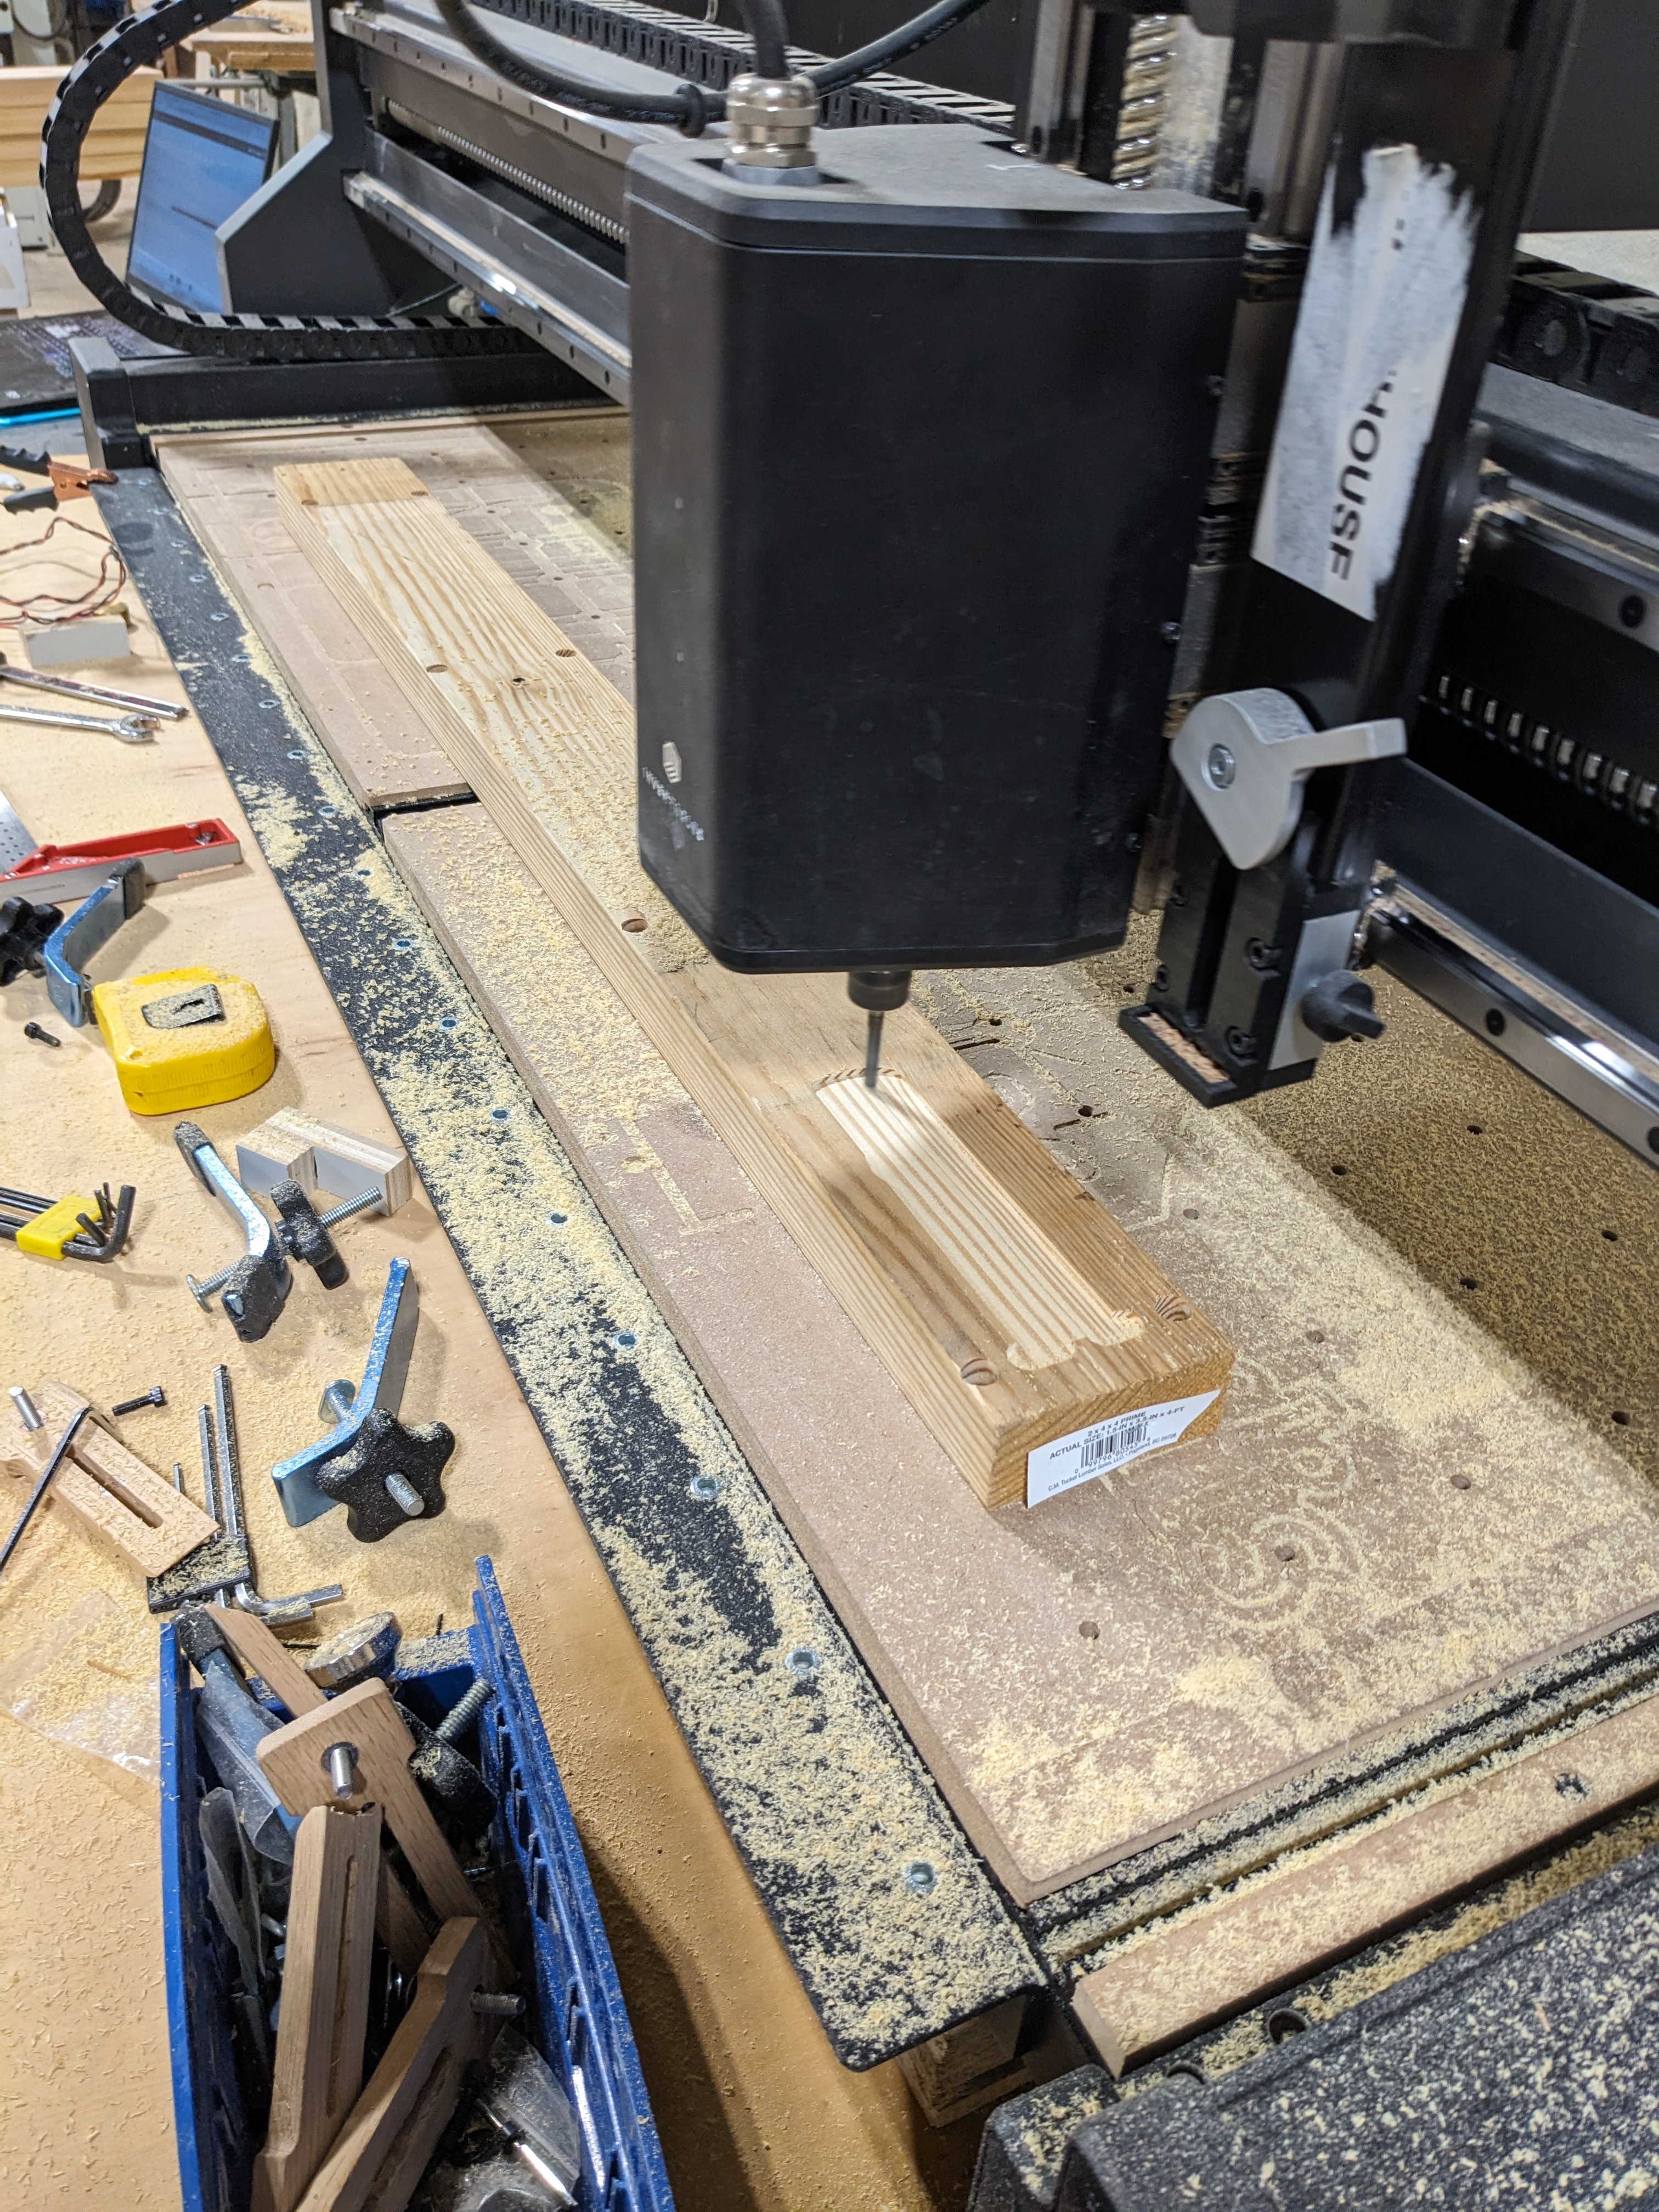
Cutting the fixture out of a warped scrap 2x4.
I designed this single fixture to hold all of the different parts for the shoe rack by nesting different shapes inside each other.
I think I got my work-change time down to 30 seconds for the long run of small cross-beams. The image below shows one of these 16 parts being cut (8 per rack; making two racks). I used little custom-cut throwaway clamps and screws, as pictured. However, I think that reusable toggle clamps would be worth using for any future fixture work. Cycle time will drop and (more importantly) accuracy will improve.
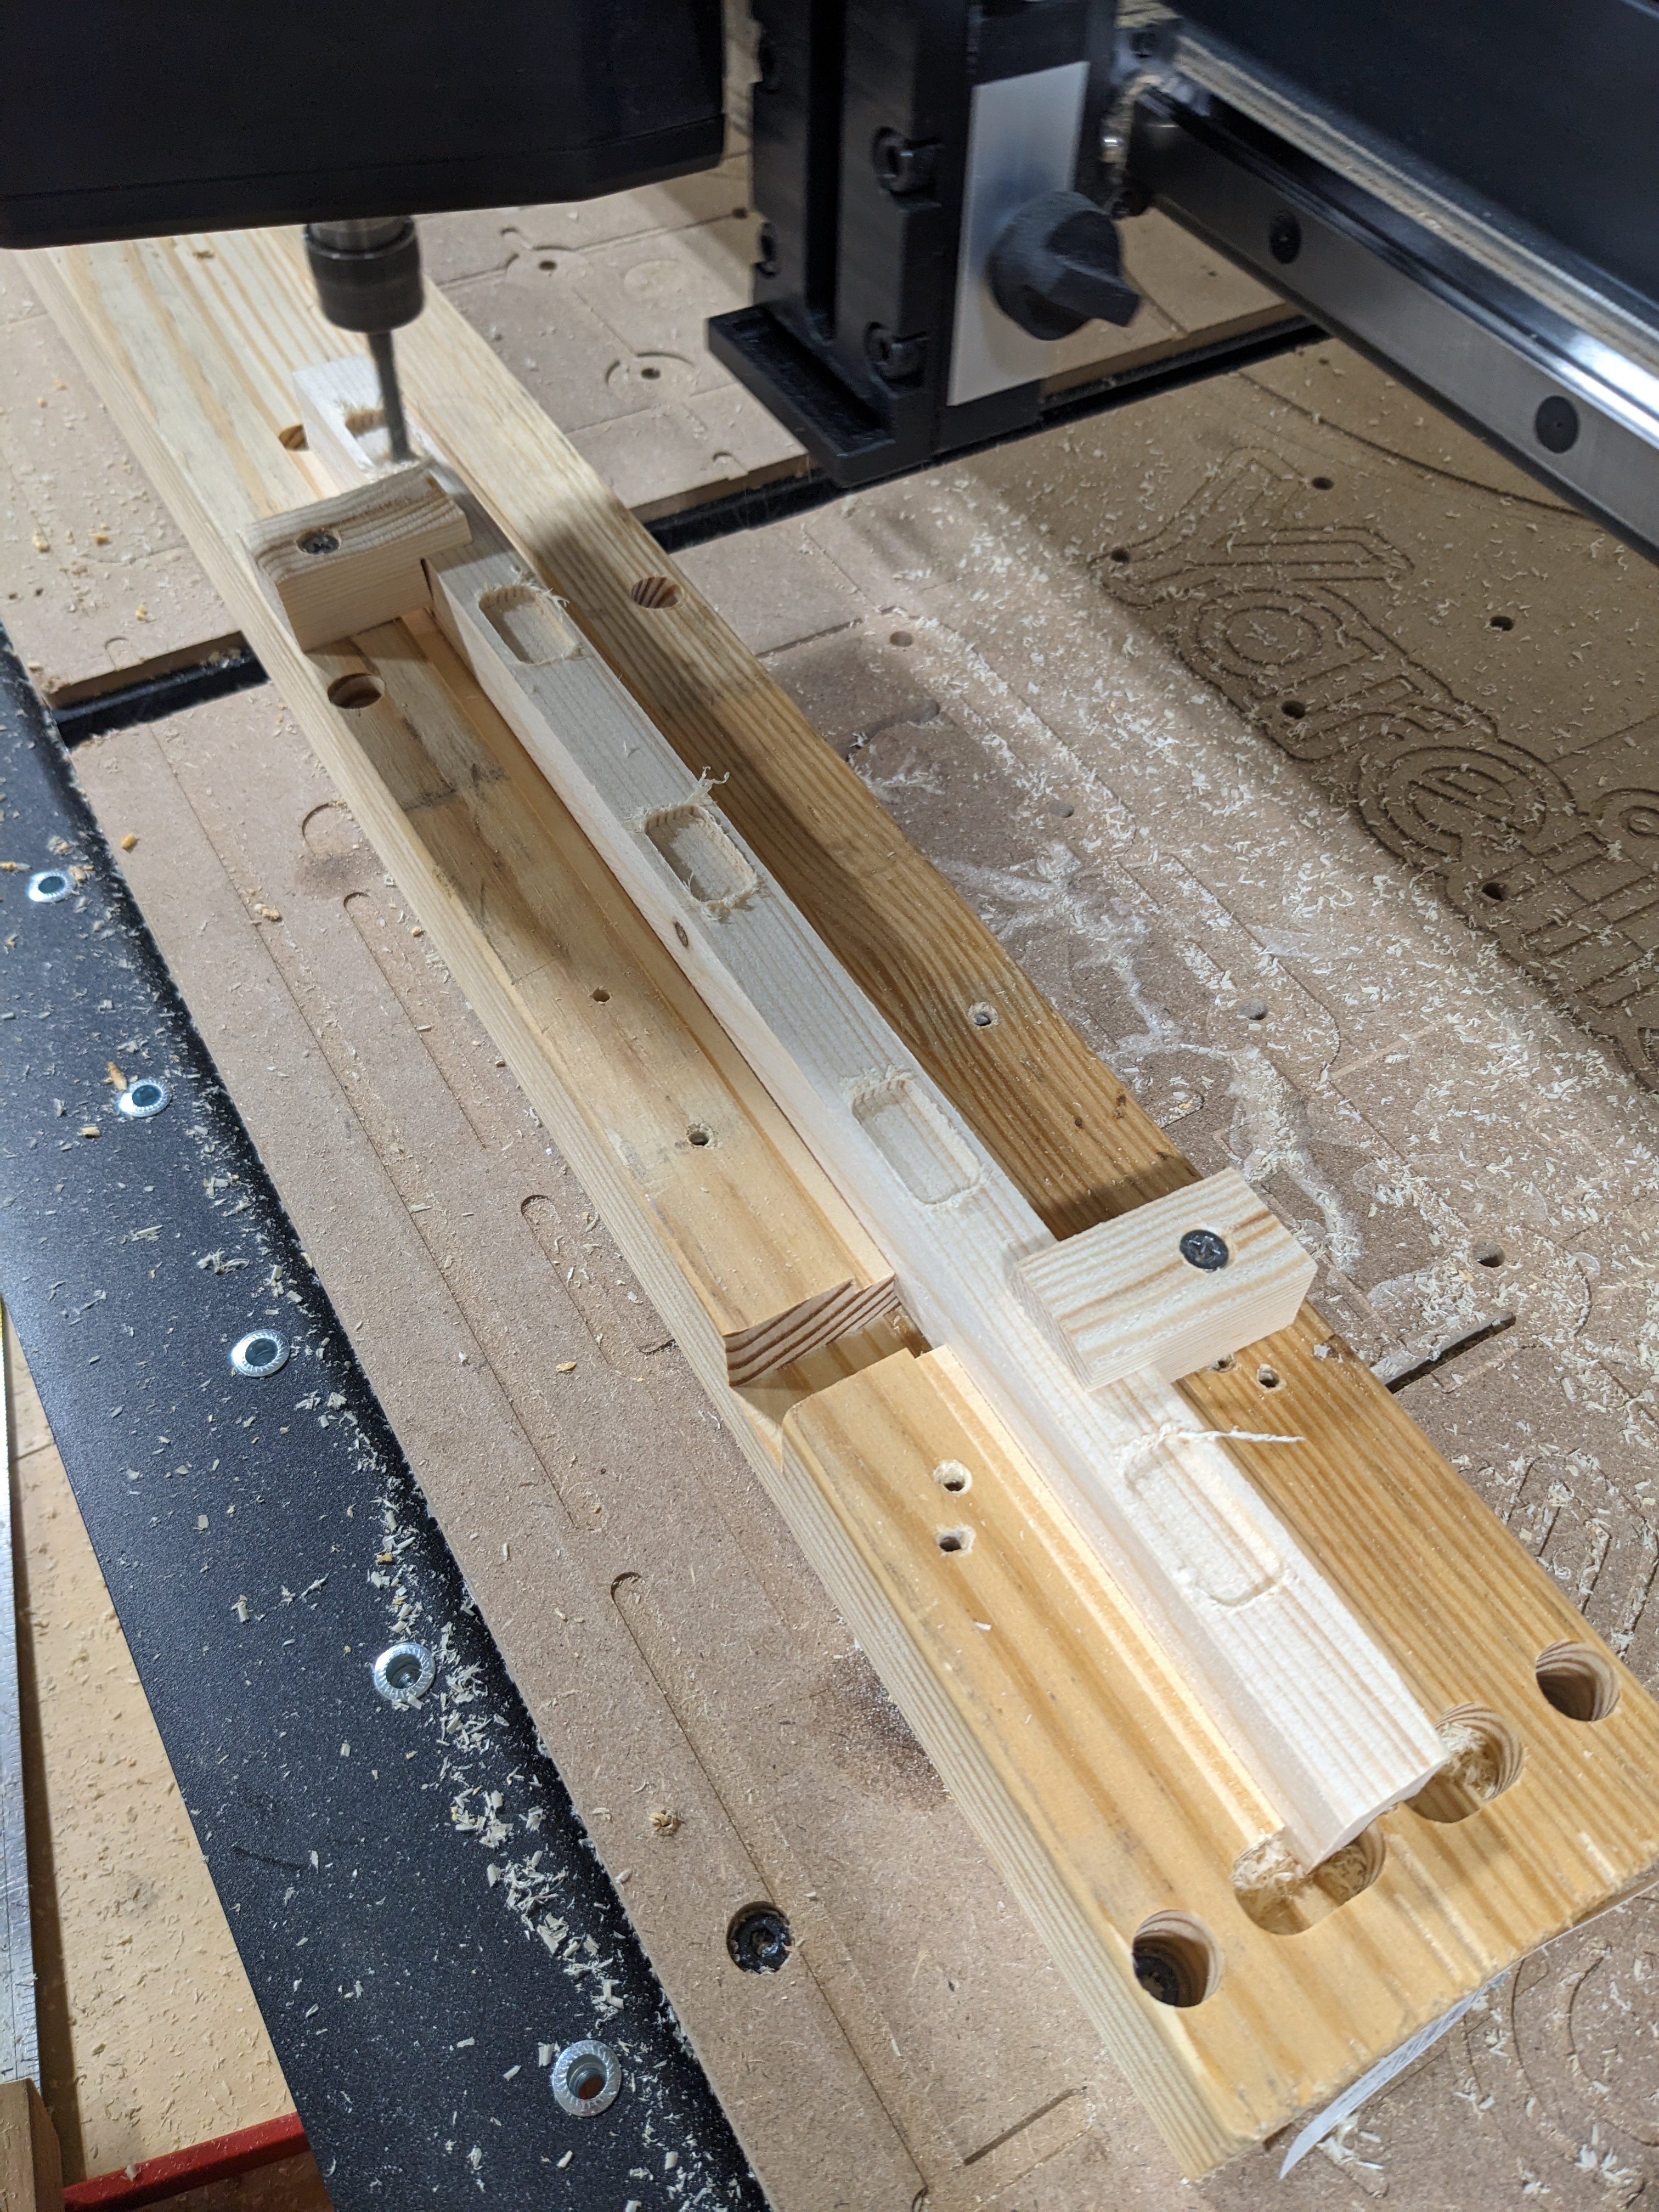
One last note. I added an extra 0.05" of space in both dimensions for the work-holding cutouts in the fixture. This ended up being sloppy (planing tolerance is around +/- 0.008", I have discovered) and could probably be taken down to 0.01" in the future.
Trash Pine is Trash Pine
I used the cheapest possible lumber for this job - 2x4's from Lowes. Material costs were something like $12 per rack, which I'm really proud of. However, the color and density of the wood was inconsistent. Many knots and other imperfections existed in the wood, and quite a bit of 'feathering' occurred at the tops of the mortise-cuts (see section above).
For all but the lowest quality jobs (like this one), I expect that it's not worth using cheap trash pine. Such pine costs in the realm of $1.5 / BF - an unbeatable price, but the difference in price must be compared to time and end quality. At the very least, pine from a proper lumberyard would serve better.
Quick Summary
Lessons:
- Oversize tablesaw cuts by 0.05" to 0.1" and plane both sides, if possible given CS geometry.
- Take fit gap on fixture work-holding cut down to 0.01".
- Get some toggle clamps for future fixtures.
- Use hardwoods for future work.
- More planning is needed for glue-up, as this method doesn't provide any auto-aligning right angles.